Showing posts with label How to. Show all posts
Showing posts with label How to. Show all posts
Jan 26, 2009
How to Open an eBay Store
1. Sign up for an eBay sellers' account if you don't already have one. This will require you to choose an ID name, register with your contact information and put a credit card on file.
2. Look at the left side of the screen once you are signed in. Go all the way to the bottom of the page and look at the "Related Links" button. This box has an "eBay stores" link. Click on that link to bring up the eBay Stores gateway area. This will have a lot of information for you about how an eBay store works, what the different types of eBay stores are and how much each type costs.
3. Look through the eBay Stores information on this page and see if opening an eBay Store is right for you. There is a monthly fee of $15.95 for the cheapest store and higher prices for more complicated stores that are featured by the site. If you aren't sure whether the store will be right for you, start with a simpler eBay store that won't cost a lot each month. If you choose to open one, give it a name that captures the flavor of what you sell.
4. Stock your store with items to sell on eBay. Once you open an eBay Store, you can list items as you normally would, but choose the "Store Listing" tab for them instead of the "Auction" or "Fixed Price" tab. Make sure to include a picture and write a detailed description of each item.


How to Add or Edit Your Google Local Business Listing
Check if your business is already listed. Go to maps.google.com and do a search for your business name and location. For example, I would type into the search bar: "pet store, chicago il 60623" if I was looking for a local pet store. Unless your business is fairly new, you should already have some sort of listing, but it might need to be updated. Note that you must be logged into your Google Account to add or edit information!
Claim Your Business. If your business is not anywhere to be found among the listings that come up, then sign your business up with the Google Maps Local Business Center at http://www.google.com/local/add. If your business is already listed, click on it and a pop-up will show up on the map to the right. Select "Edit" and another pop-up will appear. Click on "Claim Your Business".
Edit your business information. You will be taken to a screen that gives you the option to add, edit or suspend a listing. If this is your listing, choose "Edit my business information" and then "Continue".
Submit your business information. Fill in all the information you wish to share about your business. Google allows you to share your website, a description of your business, hours, photos, and more! You can even fix the marker location that points to your business on the map if it's positioned incorrectly. Hit the "Submit" button at the bottom once you're done.
Validate your listing. You can choose to do this either by phone or postcard. Validating by postcard will take 2 to 3 weeks, which might be a good option depending on where your business is located. If you choose by phone, you will receive a call from Google at your business phone line, so make sure you are available to answer! You can choose for Google to "Call Me Now" or "Call Me in 5 minutes". Take note of your 4-digit pin number - Google will ask you to enter this followed by the # key. After completing the call, you will see a message that your listing has been verified. Your listing should be active within the next month.
Jan 25, 2009
How to Increase Traffic with META-Indexes
META-Indexes are Internet directories that provide links pertaining to a specific topic or interest. These specialized directories allow users to find exactly what they're looking for without having to sift through hundreds, even thousands, of irrelevant search results.
There are META-Indexes for every imaginable topic, and are invaluable for reaching out to your target audience. As a site owner, you should be listing your site in as many relevant META-Indexes as possible and using them to their full potential. Follow these simple steps to get started.
1. First, you have to find appropriate META-Indexes on which to list your site. The easiest method is to go to Google or Yahoo and do a search. Type in the most relevant keyword or phrase describing your site (e.g. florida vacations ) and add the keyword "directory" after it (alternatively, you can use keywords such as "index","list" or "resource" if applicable).
2. Next, add a 'plus' sign (e.g. +florida+vacations+directory) before each keyword. This simply tells the search engine to find sites that contain ALL these words. It's just a shortcut to using 'advanced search' in order to return more relevant results.
3. Click search and start visiting the list of links returned. Once you find an appropriate META-Index to list your site, look for a "Submit" or "Add URL" link. Some directories may require that you send your listing request via email. In any case, simply follow their instructions to submit your site's information.
4. Most META-Indexes are free, although some charge a fee or offer upgrades for premium listings. Stick with the free listings at first, then monitor your traffic. If you're receiving a fair amount of traffic from your free listings, then a small investment or upgrade might be worth your while.
Tips:
• While searching and browsing META-Indexes, you're going to find many other lists of related web sites and directories. Rather than get sidetracked, bookmark the links and save them for future reference.
• Consider banner advertising on relevant META-Indexes. This can be extremely effective since these directories are highly specialized, and your ad is only being exposed to your target audience.
• Adding your link to META-Indexes will improve your search engine rankings by providing relevant, high-quality back-links to your site.
How to Increase Traffic with Long-Tail Keywords
As keyword competition increases, many are seeing their traffic and search engine positioning dwindle, not to mention the high cost of PPC keywords. However, there's a virtually "untapped" backdoor to getting better search positioning and paying less for PPC keywords, while at the same time driving more qualified traffic to your site — The use of Long-Tail Keywords.
Popularized by Wired Magazine's editor Chris Anderson, Long-Tail Keywords are simply extended or natural phrases that people type into search boxes to more accurately find what they want. For example, instead of just typing "gardening", their search may look more like "growing a vegetable garden", or "landscape and gardening ideas". The more specific and detailed the search phrase, the more relevant the search results will be — And as a site owner, you should be taking advantage of this.
Long-Tail Keywords will benefit your site in several ways. Because users are typing in very specific phrases and finding exactly what they're looking for, visitors become more "qualified" and conversion rates will tend to be much higher. Search positioning will also improve dramatically since competition for these keyword-phrases is much lower than with single-keywords. Lower competition also means lower PPC costs.
The following steps will explain how to choose and implement Long-Tail Keywords:
1. Free tracking programs such as Google Analytics and Google Webmaster Tools will provide you with the "exact phrases" that your visitors typed into a search box to find your site, as well as your ranking position within the search results. I highly recommend both of these programs for site tracking, SEO and to begin developing your Long-Tail Keyword strategies.
2. HitTail, an advanced commercial keyword tool for Long-Tail Keywords, works by finding and suggesting the most promising keywords hidden in the Long-Tail of your site's search results. For a better understanding of how this software works (and also a great way to learn more about Long-Tail thinking), click on the HitTail Demo Video link in the resources below.
3. Aside from software, there are other options for discovering and developing keywords and phrases. Try removing yourself as "site owner" and become "site visitor". Then, in a "natural speaking" phrase, try to think of what YOU would type in to find the product or information you promote on your site. You should also closely examine your competition to see what keywords and phrases they're using. Especially those competitors that are getting top positions in search results.
4. Once you've chosen a few good Long-Tail Keywords, implementing them into your site is a fairly simple task. These specialized keywords and phrases should be worked into your Page Titles, META Keywords, META Descriptions and throughout your page copy. They should flow naturally within the text that they're placed, and be relevant to the content on those pages. These keywords and phrases should also be used in H1, H2, H3, STRONG, B, I, and EM tags wherever possible.
How To Know If The Site Is A Scam
In our country today, most need other ways other than an actual nine to five job to make money. So we turn to the internet since there are many websites out there that say you can do the certain task they ask you to do (such as click ads, or read e-mails) and earn money.
Most of us think that the websites seem genuine and that they will work. However these sites are not really for those, “get rich quick” schemers. Probably three-fourths of the sites will only bring in a few dollars a month, if that.
Other ‘earn money websites’ are actually scams. Those of which, I will try to help make more clear.
So want to know what to look out for when joining money earning websites? Here are some tips:
1. Research the website to make sure it is not a scam, the best thing is to start of by reading the fact (faq) page. Typically most websites should have this page. Not always do they however prove whether or not it is a scam.
2. Learn about how you have to join the site. Do you have to pay money up front just for joining? How much do you have to pay?
3. Find out about the sites payout schedule. When do they pay you? How much do they pay you? Also, how they pay. Do they use PayPal, or only use checks?
4. Realize that most sites that say, “Make lots of money fast,” are just get rich schemes, and are on the scam list.
5. Some websites seem like they are your honest-to-goodness sites, when they actually are far from that. You pay a small amount to join, and then processing fees and such and it all seem to go good. Then, you find out you have done something wrong and have to try again before you can start earning money. – For example, I tried to do this ‘at home’ job which ended up being a scam, for me at least. http://angelpin.net/income.html . They said I could earn up to $500 a week, but before you can earn the $500, you have to pay that much. This price is for all the supplies to make 200 of the pins. Another thing, honestly- can anyone make that many pins in a week?
6. If there is a certain deadline, such as, “Join in the next 30 minutes for half off!” then the site is frequently considered a scam. They will have other ‘offers’ and you will end up paying the regular amount, or even more.
Jan 24, 2009
How to Start your own Article Directory
Are you tired of reading how to write and submit articles to a directory? Would you like to have your own article directory? Well this
article is for you.
There's a few things to consider before putting an article directory together. Do you want to make a niche directory catering to only certain subjects or do you want to cover every topic under the moon? This is where our first requirement comes into play.
Deciding on a domain name. If you’re going for the niche directory you're going to want to possibly include the niche in the name of the directory.
Let's say you're into cars, then you would want your domain to be something like articlesaboutcarsthatgoreallyfast.*** or cartopicsthatiknowabout.*** or something like that. These are just examples I'm using to illustrate he use of names. You probably would not want a domain name that long. If your going for the catch all you can use something with article in it, like articlesabouteverythingimaginable.*** Again just illistration purposes. The domain name you choose doesn't have to have the word article in it, mine doesn't. There are resources on the Internet which allow you to plug in keywords and it will spit out possible domain names from your keywords.
Now it's time to look into getting a web host. I know there are literally thousands of web hosts out there and the decision can be daunting. Here
are a few things you want to look for in a web host.
* Able to host multiple domains under one account
* Plenty of storage space
* Plenty of monthly transfer
* Able to have multiple email addresses
* Able to have multiple MySql databases
* Customer service available through web, email, or phone
Search the Internet for web host reviews for more information. There are plenty of resources with ranking systems for web hosts. You could also email some web site owners to see who they use and if they are happy with them.
Next the software to run our directory. I use Article Dashboard. Article Dashboard is free software to run your own directory. I'm not saying this is the only software out there, I'm just saying that it's great and free, you can't beat that!
After following the directions for installing the directory it's time to get some articles. Lots of article directories allow use of their articles as long as you keep all links the same and give credit where it's due. Just check each site's policy for exact rules relating to the use of their content. Another way is to read articles and contact the original author and invite them to write and send articles to your site. You can also sign up for sites that "push out articles" to you. This is a great way to get lots of articles quickly but it is also a good idea to get some original content.
Well this is about all for now, please visit my site for more information, free articles and Cajun Info. Please don't hesitate to contact me if you have any questions.
Jan 22, 2009
Blogger: How do I delete a blog?
To delete your entire blog, just go to Settings | Basic:

At this point, make absolutely sure that you are on the right blog and that you want to permanently remove it from your account. Then click Delete This Blog: and confirm by clicking OK

Jan 19, 2009
How Bloggers Make Money from Blogs
_______________
My Personal Income Streams
As an update to this post I’ve more recently written one on How I make Money Blogging which highlights the most profitable ways that I use blogs to generate income. I’ve also written extensively on how bloggers make money in ProBlogger the Book.
How do bloggers make money from blogs?
How-Bloggers-Make-MoneyI’ve been reflecting this week about the amazing diversity of opportunities that are opening up for bloggers to make money from blogging.
I’ve long advised that bloggers seeking to make money from blogging spread their interests across multiple revenue streams so as not to put all their eggs in one basket.
The wonderful thing is that this is becoming easier and easier to do 2005 has seen many options opening up. I thought I’d take a look at some of the methods that bloggers are currently using to make money through blogs.
Income Streams for Bloggers - How to Make Money Blogging
Advertising Programs - Perhaps the most obvious changes in the past few months have been with the addition of a variety of viable advertising options for bloggers looking to make money from their blogs. The most common way bloggers seem to earn money online is via the contextual ad program from Google - Adsense. A more recent addition that many are using successfully are Chitika’s eMiniMalls and WidgetBucks, Text Link Ads.
Azoogle Ads, Intelli Txt, DoubleClick, Tribal Fusion, Adbrite, Clicksor, AdHearUs, Kanoodle, Pheedo, TextAds, Bidvertiser, Fastclick and Value Click (to name just some of the options) and there is a smorgasbord of options. Of course there is more to come with MSN Adcenter and YPN both in beta testing and with a variety of other advertising system currently in development (YPN is only available to US publishers).
Lastly there’s BlogAds - one of the first blog specific ad networks.
RSS Advertising - The past 12 months have seen some advances in RSS Advertising also. I’m yet to hear of any bloggers making big money blogging through it to this point - but as improvements are made to the ad programs exploring this I’m sure we’ll start to see examples of it being profitable.
Sponsorship - In addition to the array of advertising programs that are available to join there is a growing awareness in the business of the value and opportunity that exists for them to advertise directly on blogs. I’m hearing more and more examples of this and have been fortunately to have a couple of ad campaigns of my own in the past month - one with Adobe a couple of weeks ago and another just completed with Ricoh for a new digicam over at my Digital Camera Blog. These are not isolated cases - as I say I know of many blogs exploring sponsorship with advertisers at present and suspect we’ll see more of it in the year ahead. Sponsorship is also happening on a post by post basis with some bloggers being paid to write on certain topics by companies - either in one off or a regular fashion - and they are able to make big money from their blogs doing so.
Affiliate Programs - There are larger affiliate programs like Amazon, Linkshare, Clickbank and Commission Junction but also literally thousands of others from the large to the very small.
Digital Assets - Increasing numbers of bloggers have been developing other digital assets to support and add revenue streams to their blogs. By this I mean that I’m increasingly seeing e-books, courses and tele-seminars being run by bloggers. My recent foray into this with the first series of the six figure blogging course that Andy and I ran a few weeks ago and have just released the study version of. This type of activity will only increase in future - in fact this week I’ve seen numerous examples of bloggers running courses.
Blog Network Opportunities - with the rise in popularity of Blog Networks - bloggers are also being presented with more places to earn an income from their blogging - by writing for and with others. While it might be difficult to get a writing gig with one of the bigger networks - there are plenty who are always asking for new bloggers to join and who are willing to pay bloggers using a variety of payment models. While there are distinct advantages of blogging for yourself - blogging for an established network who will handle a lot of the set up/promotion/admin/SEO etc has it’s advantages also. More and more bloggers are combining writing for themselves on their own blogs with taking on blog network blogs as additional income streams.
Business Blog Writing Opportunities - as blogging has risen in it’s profile as a medium more and more businesses are starting blogs. Many of these companies have internal staff take on blogging duties - but an increasing number of them are hiring specialist bloggers to come on and run their blogs. I know of a number of bloggers who in the past month or two have been approached for such paid work. Check out Bloggers for Hire if you’re looking for this type of work.
Non Blogging Writing Opportunities - Also becoming more common are bloggers being hired to write in non blogging mediums. Manolo’s recent coup of a column in the Washington Post is just one example of this as bloggers are increasingly being approached to write for newspapers, magazines and other non blog websites. Along side this is the rise of bloggers as published book authors - this is to the extent that one blogger I spoke with this week complained to me that they were one of the few bloggers than they knew who didn’t have a book deal!
Donations - Tip Jars and donation buttons have been a part of blogging for years now but this last year saw a number of bloggers go full time after fund raising drives. Perhaps the most high profile of these was Jason Kottke of kottke.org who through the generosity of his readership was able to quit his job and become a full time blogger.
Flipping Blogs - Also more common in 2005 was the practice of ‘Blog Flipping’ - or selling of blogs. This has happened both on an individual blog level (I can think of about 20 blogs that sold this year) but also on a network level (the most obvious of these being the 8 figure sale of Weblogs Inc to AOL).
Merchandising - My recent attempt to sell ProBlogger.net T-shirts wasn’t a raging success, but it is an example of how an increasing number of bloggers are attempting to make a few extra dollars from their blogs by selling branded products through programs like Cafepress. While I didn’t have a lot of success with merchandising - quite a few larger blogs are seeing significant sales - especially blogs with a cult following. I’m not at liberty to discuss details - but I know of one largish blog which will see sales over $20,000 in merchandise for the calendar year of 2005.
Consulting and Speaking - While it has been popular for established consultants to add blogs to their businesses we’re also starting to see bloggers with no consulting background able to make money by charging readers for their time in consulting scenarios BECAUSE of the profile that their blogs have built them. Blogging has the ability to establish people as experts on niche topics and we all know the value of being perceived as an expert. I spoke to one blogger last month who charges himself out at over $200 an hour for speaking and consulting work - his area of expertise was something that he knew little about 18 months ago - but through his blog he’s become a leader in his field and a minor celebrity in his industry.
As time rolls on there are more and more ways that bloggers make money from their blogs opening up. Feel free to suggest your own ideas and experiences in comments below.
Update: Looking for more information on how to make money blogging? Here’s a post I wrote talking about my own experience - particularly looking at the top ways that I make money from blogs.
My Personal Income Streams
As an update to this post I’ve more recently written one on How I make Money Blogging which highlights the most profitable ways that I use blogs to generate income. I’ve also written extensively on how bloggers make money in ProBlogger the Book.
How do bloggers make money from blogs?
How-Bloggers-Make-MoneyI’ve been reflecting this week about the amazing diversity of opportunities that are opening up for bloggers to make money from blogging.
I’ve long advised that bloggers seeking to make money from blogging spread their interests across multiple revenue streams so as not to put all their eggs in one basket.
The wonderful thing is that this is becoming easier and easier to do 2005 has seen many options opening up. I thought I’d take a look at some of the methods that bloggers are currently using to make money through blogs.
Income Streams for Bloggers - How to Make Money Blogging
Advertising Programs - Perhaps the most obvious changes in the past few months have been with the addition of a variety of viable advertising options for bloggers looking to make money from their blogs. The most common way bloggers seem to earn money online is via the contextual ad program from Google - Adsense. A more recent addition that many are using successfully are Chitika’s eMiniMalls and WidgetBucks, Text Link Ads.
Azoogle Ads, Intelli Txt, DoubleClick, Tribal Fusion, Adbrite, Clicksor, AdHearUs, Kanoodle, Pheedo, TextAds, Bidvertiser, Fastclick and Value Click (to name just some of the options) and there is a smorgasbord of options. Of course there is more to come with MSN Adcenter and YPN both in beta testing and with a variety of other advertising system currently in development (YPN is only available to US publishers).
Lastly there’s BlogAds - one of the first blog specific ad networks.
RSS Advertising - The past 12 months have seen some advances in RSS Advertising also. I’m yet to hear of any bloggers making big money blogging through it to this point - but as improvements are made to the ad programs exploring this I’m sure we’ll start to see examples of it being profitable.
Sponsorship - In addition to the array of advertising programs that are available to join there is a growing awareness in the business of the value and opportunity that exists for them to advertise directly on blogs. I’m hearing more and more examples of this and have been fortunately to have a couple of ad campaigns of my own in the past month - one with Adobe a couple of weeks ago and another just completed with Ricoh for a new digicam over at my Digital Camera Blog. These are not isolated cases - as I say I know of many blogs exploring sponsorship with advertisers at present and suspect we’ll see more of it in the year ahead. Sponsorship is also happening on a post by post basis with some bloggers being paid to write on certain topics by companies - either in one off or a regular fashion - and they are able to make big money from their blogs doing so.
Affiliate Programs - There are larger affiliate programs like Amazon, Linkshare, Clickbank and Commission Junction but also literally thousands of others from the large to the very small.
Digital Assets - Increasing numbers of bloggers have been developing other digital assets to support and add revenue streams to their blogs. By this I mean that I’m increasingly seeing e-books, courses and tele-seminars being run by bloggers. My recent foray into this with the first series of the six figure blogging course that Andy and I ran a few weeks ago and have just released the study version of. This type of activity will only increase in future - in fact this week I’ve seen numerous examples of bloggers running courses.
Blog Network Opportunities - with the rise in popularity of Blog Networks - bloggers are also being presented with more places to earn an income from their blogging - by writing for and with others. While it might be difficult to get a writing gig with one of the bigger networks - there are plenty who are always asking for new bloggers to join and who are willing to pay bloggers using a variety of payment models. While there are distinct advantages of blogging for yourself - blogging for an established network who will handle a lot of the set up/promotion/admin/SEO etc has it’s advantages also. More and more bloggers are combining writing for themselves on their own blogs with taking on blog network blogs as additional income streams.
Business Blog Writing Opportunities - as blogging has risen in it’s profile as a medium more and more businesses are starting blogs. Many of these companies have internal staff take on blogging duties - but an increasing number of them are hiring specialist bloggers to come on and run their blogs. I know of a number of bloggers who in the past month or two have been approached for such paid work. Check out Bloggers for Hire if you’re looking for this type of work.
Non Blogging Writing Opportunities - Also becoming more common are bloggers being hired to write in non blogging mediums. Manolo’s recent coup of a column in the Washington Post is just one example of this as bloggers are increasingly being approached to write for newspapers, magazines and other non blog websites. Along side this is the rise of bloggers as published book authors - this is to the extent that one blogger I spoke with this week complained to me that they were one of the few bloggers than they knew who didn’t have a book deal!
Donations - Tip Jars and donation buttons have been a part of blogging for years now but this last year saw a number of bloggers go full time after fund raising drives. Perhaps the most high profile of these was Jason Kottke of kottke.org who through the generosity of his readership was able to quit his job and become a full time blogger.
Flipping Blogs - Also more common in 2005 was the practice of ‘Blog Flipping’ - or selling of blogs. This has happened both on an individual blog level (I can think of about 20 blogs that sold this year) but also on a network level (the most obvious of these being the 8 figure sale of Weblogs Inc to AOL).
Merchandising - My recent attempt to sell ProBlogger.net T-shirts wasn’t a raging success, but it is an example of how an increasing number of bloggers are attempting to make a few extra dollars from their blogs by selling branded products through programs like Cafepress. While I didn’t have a lot of success with merchandising - quite a few larger blogs are seeing significant sales - especially blogs with a cult following. I’m not at liberty to discuss details - but I know of one largish blog which will see sales over $20,000 in merchandise for the calendar year of 2005.
Consulting and Speaking - While it has been popular for established consultants to add blogs to their businesses we’re also starting to see bloggers with no consulting background able to make money by charging readers for their time in consulting scenarios BECAUSE of the profile that their blogs have built them. Blogging has the ability to establish people as experts on niche topics and we all know the value of being perceived as an expert. I spoke to one blogger last month who charges himself out at over $200 an hour for speaking and consulting work - his area of expertise was something that he knew little about 18 months ago - but through his blog he’s become a leader in his field and a minor celebrity in his industry.
As time rolls on there are more and more ways that bloggers make money from their blogs opening up. Feel free to suggest your own ideas and experiences in comments below.
Update: Looking for more information on how to make money blogging? Here’s a post I wrote talking about my own experience - particularly looking at the top ways that I make money from blogs.
How to install blogger blogspot template code
_______________
1. Log into your blogspot account.
2. Click on the “Template” link.
3. Open the template code file that you downloaded from our site in Notepad.
4. Now Select & Copy everything from this code file and Replace your current blogger template code with this.
5. Then, save the template changes and congrats!
1. Log into your blogspot account.
2. Click on the “Template” link.
3. Open the template code file that you downloaded from our site in Notepad.
4. Now Select & Copy everything from this code file and Replace your current blogger template code with this.
5. Then, save the template changes and congrats!
How to install a xml blogger template
_______________
Step 1.
Sign in to your Blogger dashboard then click on the layout link in the Manage section, next to your blog name

Step 2.
Select the “Edit HTML” tab at the top

Step 3.
Before installing the template, remember to backup your old template ! It is always the good practice, really!
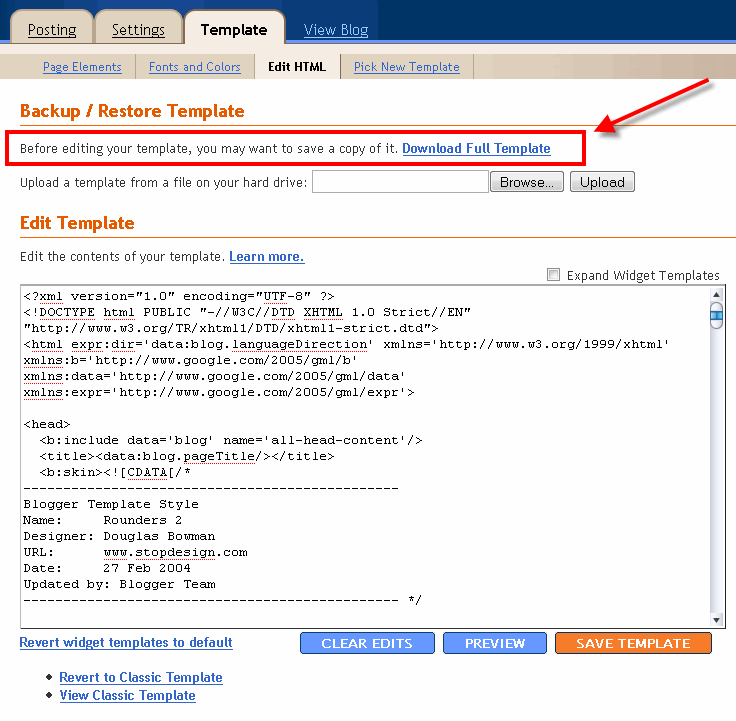
First, download the current template using the “Download Full Template” option

Step 4.
Next, upload the downloaded template using the Browse button

Step 5.
Save the changes and you are DONE.
If you are asked “Please confirm that the following widgets should be deleted. All the widgets’ configuration data will be lost“, just Click on CONFIRM & SAVE button (as shown in the screenshot below)

That’s it! Now you have sucessfully installed the xml blogger template in your blog. Start blogging 
How to Install a Blogger XML Template
_______________
Step #1 - Backup Your Current Template


Many people make the same mistake when installing a new blogger template. Most problems when installing a new template are caused by the blogger widgets (Page Elements) that you’ve spent time setting up in your previous template. Almost all Blogger templates available for download on this site are in the new Blogger xml template format so if you’ve downloaded the template from us, it’s going to be much easier to follow our instructions.
Step #1 - Backup Your Current Template
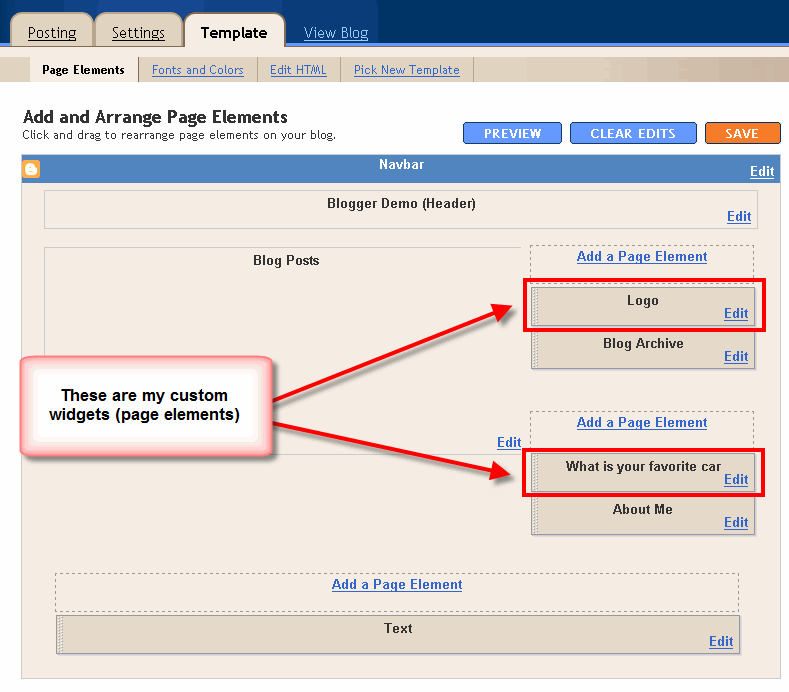
Step #2 - Take a Screenshot of Your Page Elements
Step #3 - Upload Your New Blogger Template
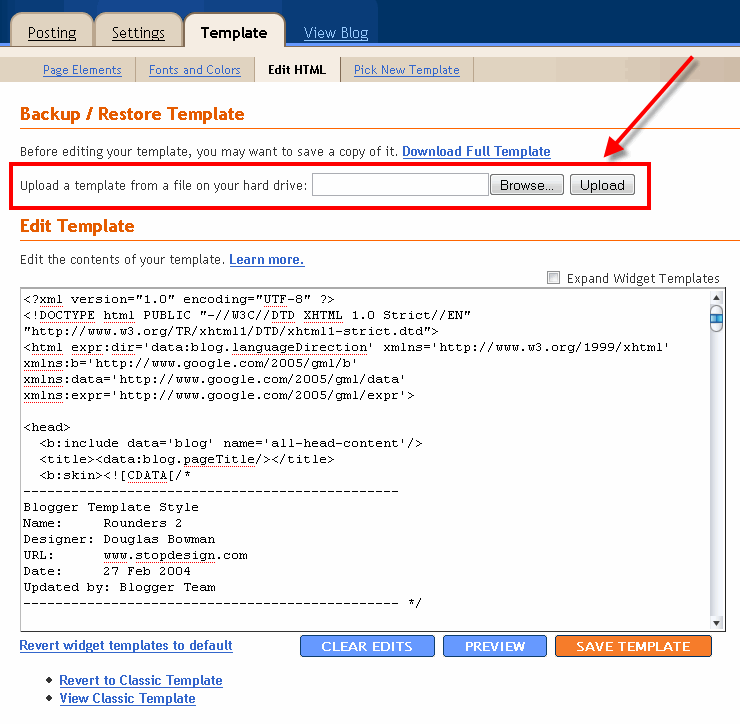
At this point Blogger is attempting to apply the new .xml Blogger template to your blog. After it’s done, you’ll get a message stating that the upload and new template was applied successfully (in that case you’re done!) or more likely in my case, you’ll get a red error message that states something like:
Widgets are about to be deleted
Please confirm that the following widgets should be deleted. All the widgets’ configuration data will be lost.
- Text1
- BloggerButton1
- Poll1
- Profile1
Now if you’re like me, you don’t want to lose all those widgets (Page Elements) you spent lots of time configuring and arranging on your blog. If you don’t care and really don’t have anything you’ll be upset losing, then go ahead and click on the “Confirm and Save” button that looks like this:

Just remember, that you’ll need to re-add any page elements that you had previously setup in your old template. If they were simple or just recently added then I’d recommend just re-adding them instead of having to follow the next steps. If you decide you want to keep your widgets (Page Elements) then write down (or take another screenshot) the list mentioned above that are going to be deleted. You’ll use this list later when we migrate over your widgets.
Step #4 - Transfer Widgets to New Blogger Template
This process is going to take some careful cut and pasting within the template code so if you’re not comfortable doing this, then I’d recommend just ending on the previous step. First things first, click on the blue cancel button (you should still be on the previous step) that looks like this:

This will cancel out of the new Blogger template you were just trying to upload. Next, we’re going to essentially make a temporary placeholder for your widgets (Page Elements) within your current template. You should still be in the “Template” => “Edit HTML” section of Blogger so if you’re not, go back to that section.
You’re going to actually edit this template code now so pay close attention. Look for the following piece of code which is all the way at the bottom.